Settings
Team & permissions
Members, roles and invitations
Who works with you in the dashboard, on which team, and with what permissions.
Open the page in the dashboardHow your team works in Capi
Everyone who signs in to the dashboard is a member of your account, and each member has a role that decides what they see and do. There's no limit on members on any subscription — bring your whole team.
The page has five tabs: “Members”, “Teams”, “Roles”, “Invitations” and “Activity log”. Permissions are checked on the server with every action, not just hidden in the UI, and a member doesn't see menu pages they can't view.
Read the members tab
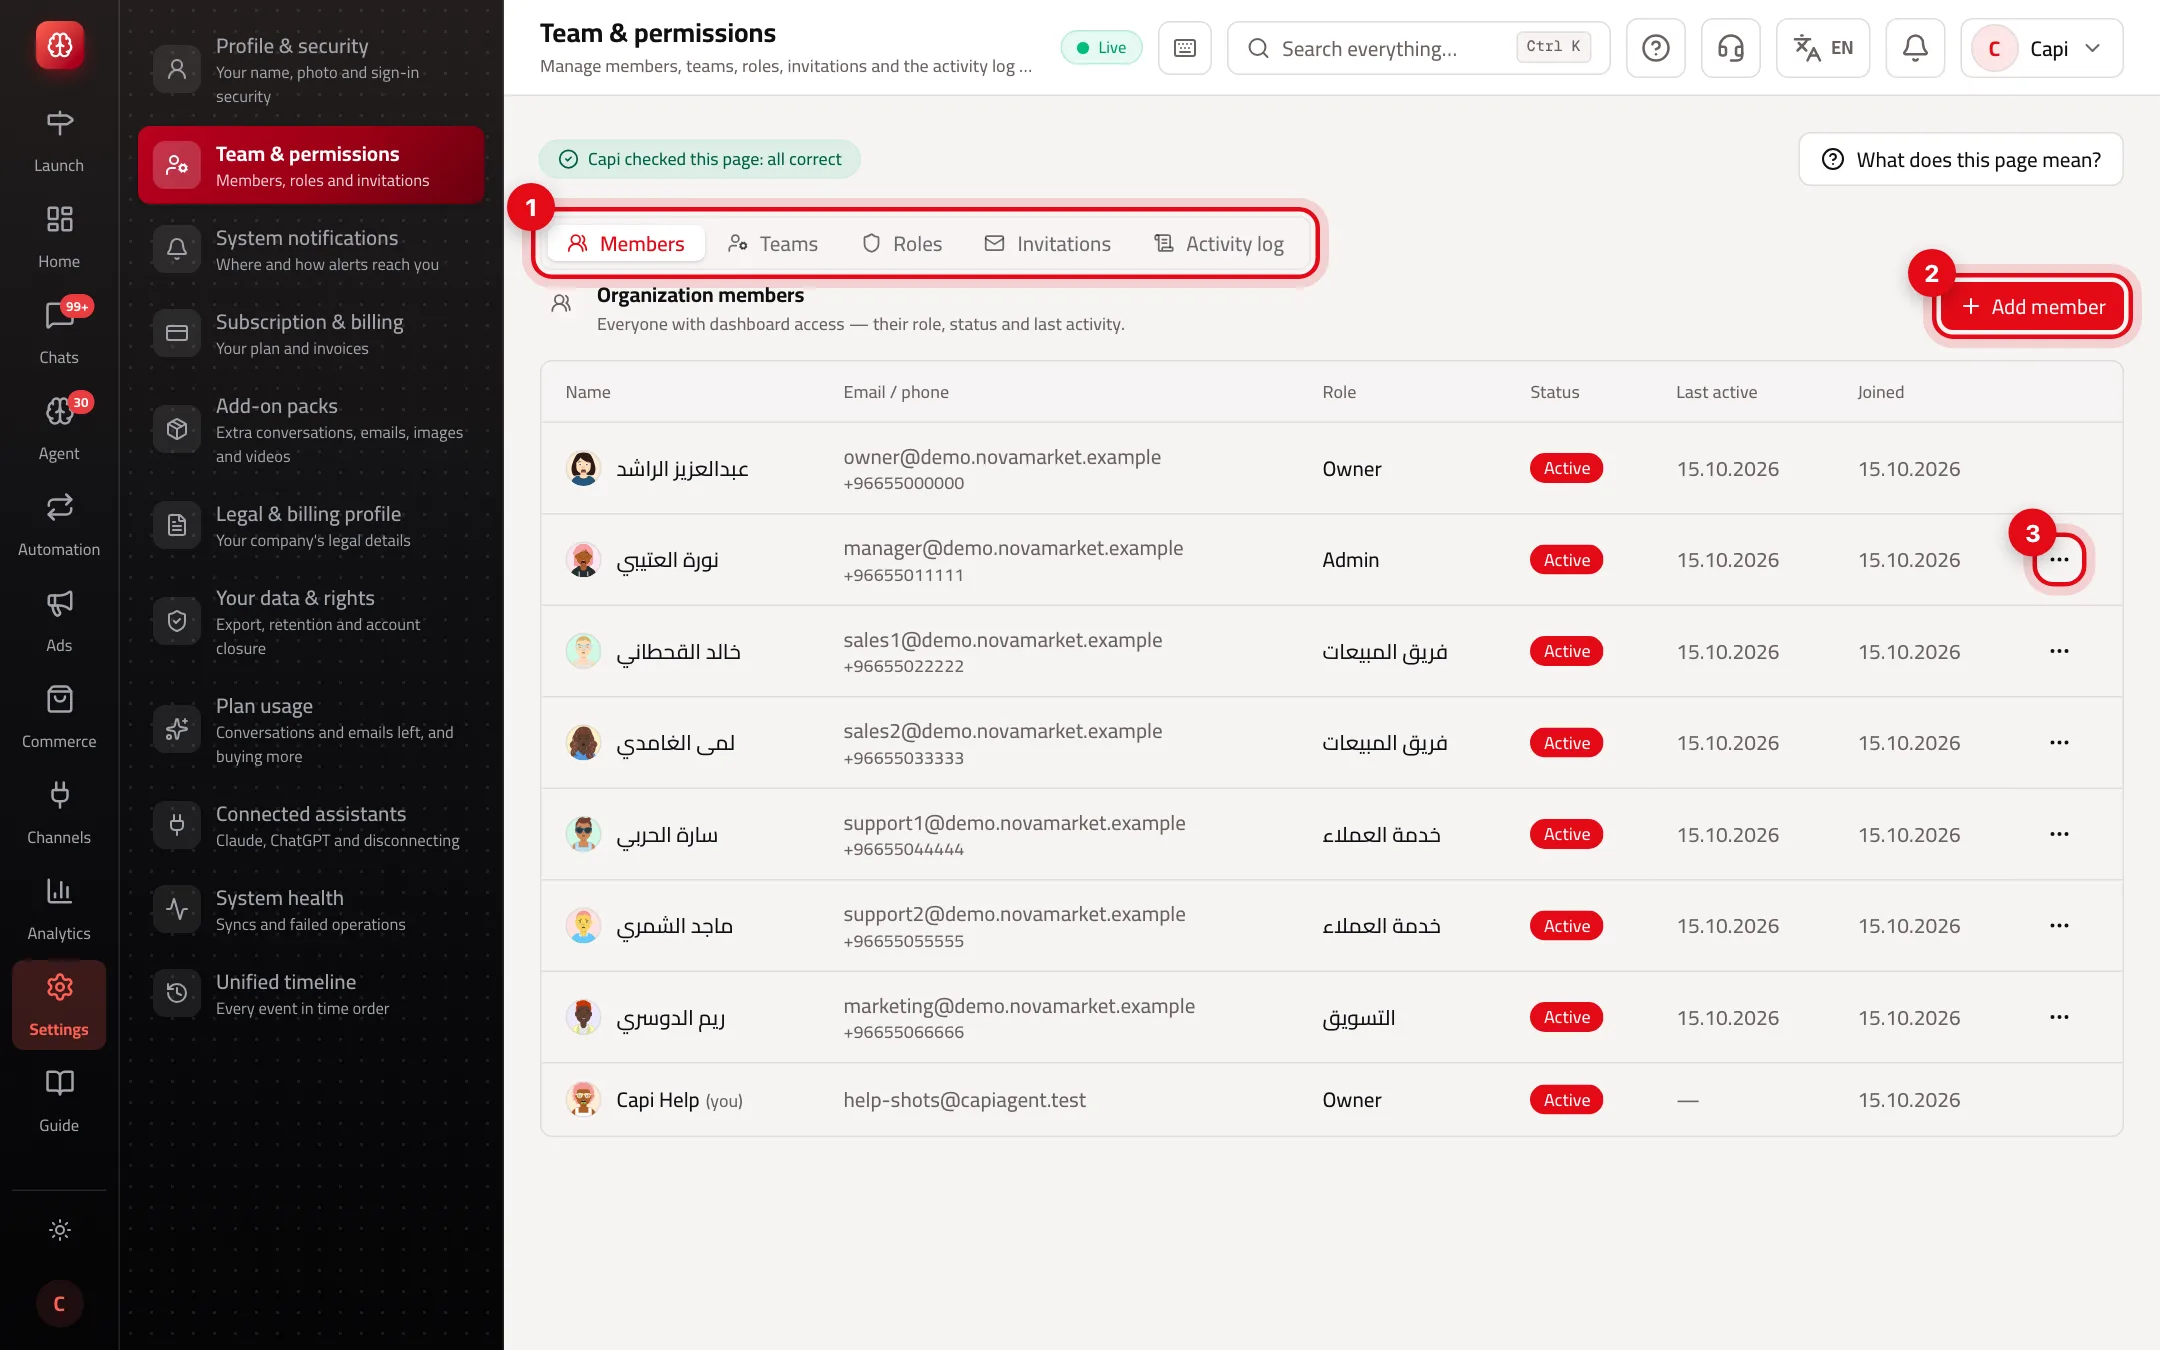
- 1The tabs: members, teams, roles, invitations, activity log.
- 2“Add member” opens the invitation window.
- 3Each member's “⋯” menu: change role, access duration, suspend, deactivate. It doesn't show for the owner or for you.
Roles and what each can do
When you invite someone or change a role, you pick one of these:
Owner
- What it is
- The account holder. Every permission; can't be changed or suspended from the members list, and never given through an invitation.
- When to use it
- The owner of the store or company.
- How to start
- Created with the account.
Admin
- What it is
- Full access to everything except transferring ownership or deleting the organization.
- When to use it
- A partner or operations manager you trust with billing, connections and the team.
- How to start
- Only a member with full access can grant it.
Member (basic access)
- What it is
- Views customers, orders, products, campaigns, conversations, analytics and ads, and replies to conversations.
- When to use it
- Someone who answers customers and doesn't change settings.
- How to start
- The default in the invitation.
Custom role
- What it is
- A role you build in the “Roles” tab with exactly the permissions it needs, such as “Sales team” or “Customer support”.
- When to use it
- When neither Admin nor Member fits — e.g. a marketer who runs campaigns but doesn't see billing.
- How to start
- Create it first, then pick it when inviting or from “Change role”.
Invite a new member
Three steps; nothing is sent until you press “Yes, send invitation” on the last one.
- 1
Contact details
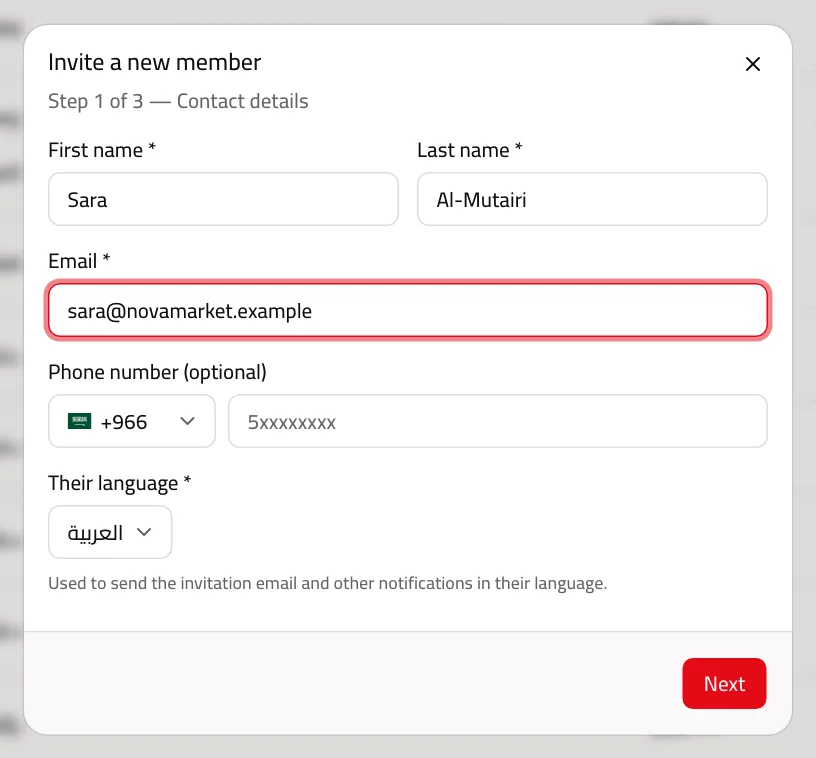
Press “Add member”. Enter first name, last name and email, a phone if you like, and “Their language” — the invitation email and their notifications use it. Then “Next”.
- 2
Role & permissions
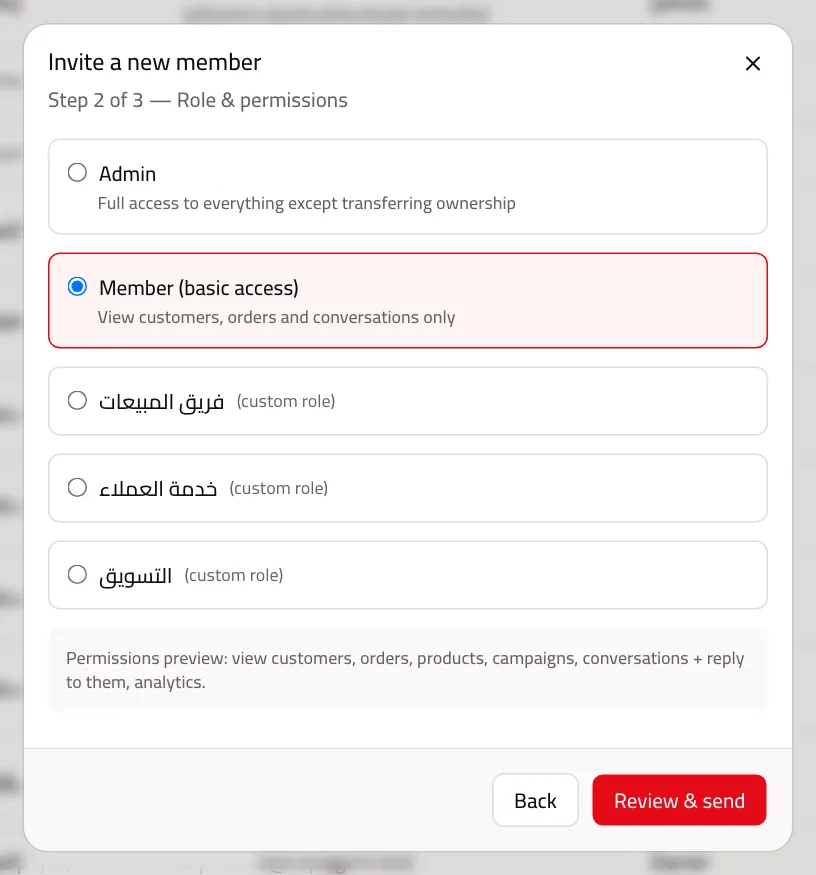
Pick “Admin”, “Member (basic access)” or one of your custom roles. A preview of what they'll be able to do shows below. Then “Review & send”.
- 3
Confirm
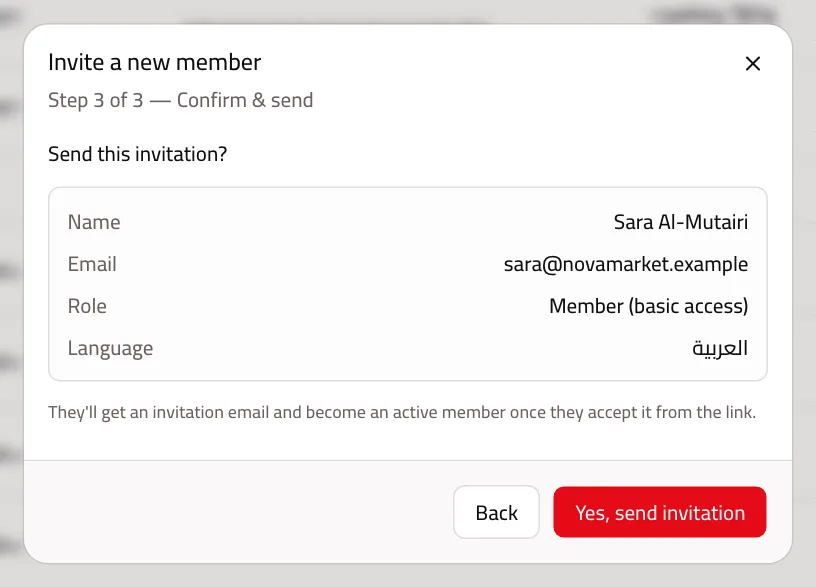
Check the name, email, role and language, then press “Yes, send invitation”.
- 4
Wait for acceptance
They get an invitation email valid for 7 days and become an active member once they accept it. Until then it sits in “Invitations” as “Awaiting acceptance”, where you can “Resend”, “Create & copy a new link” or “Cancel invitation”.
The roles tab
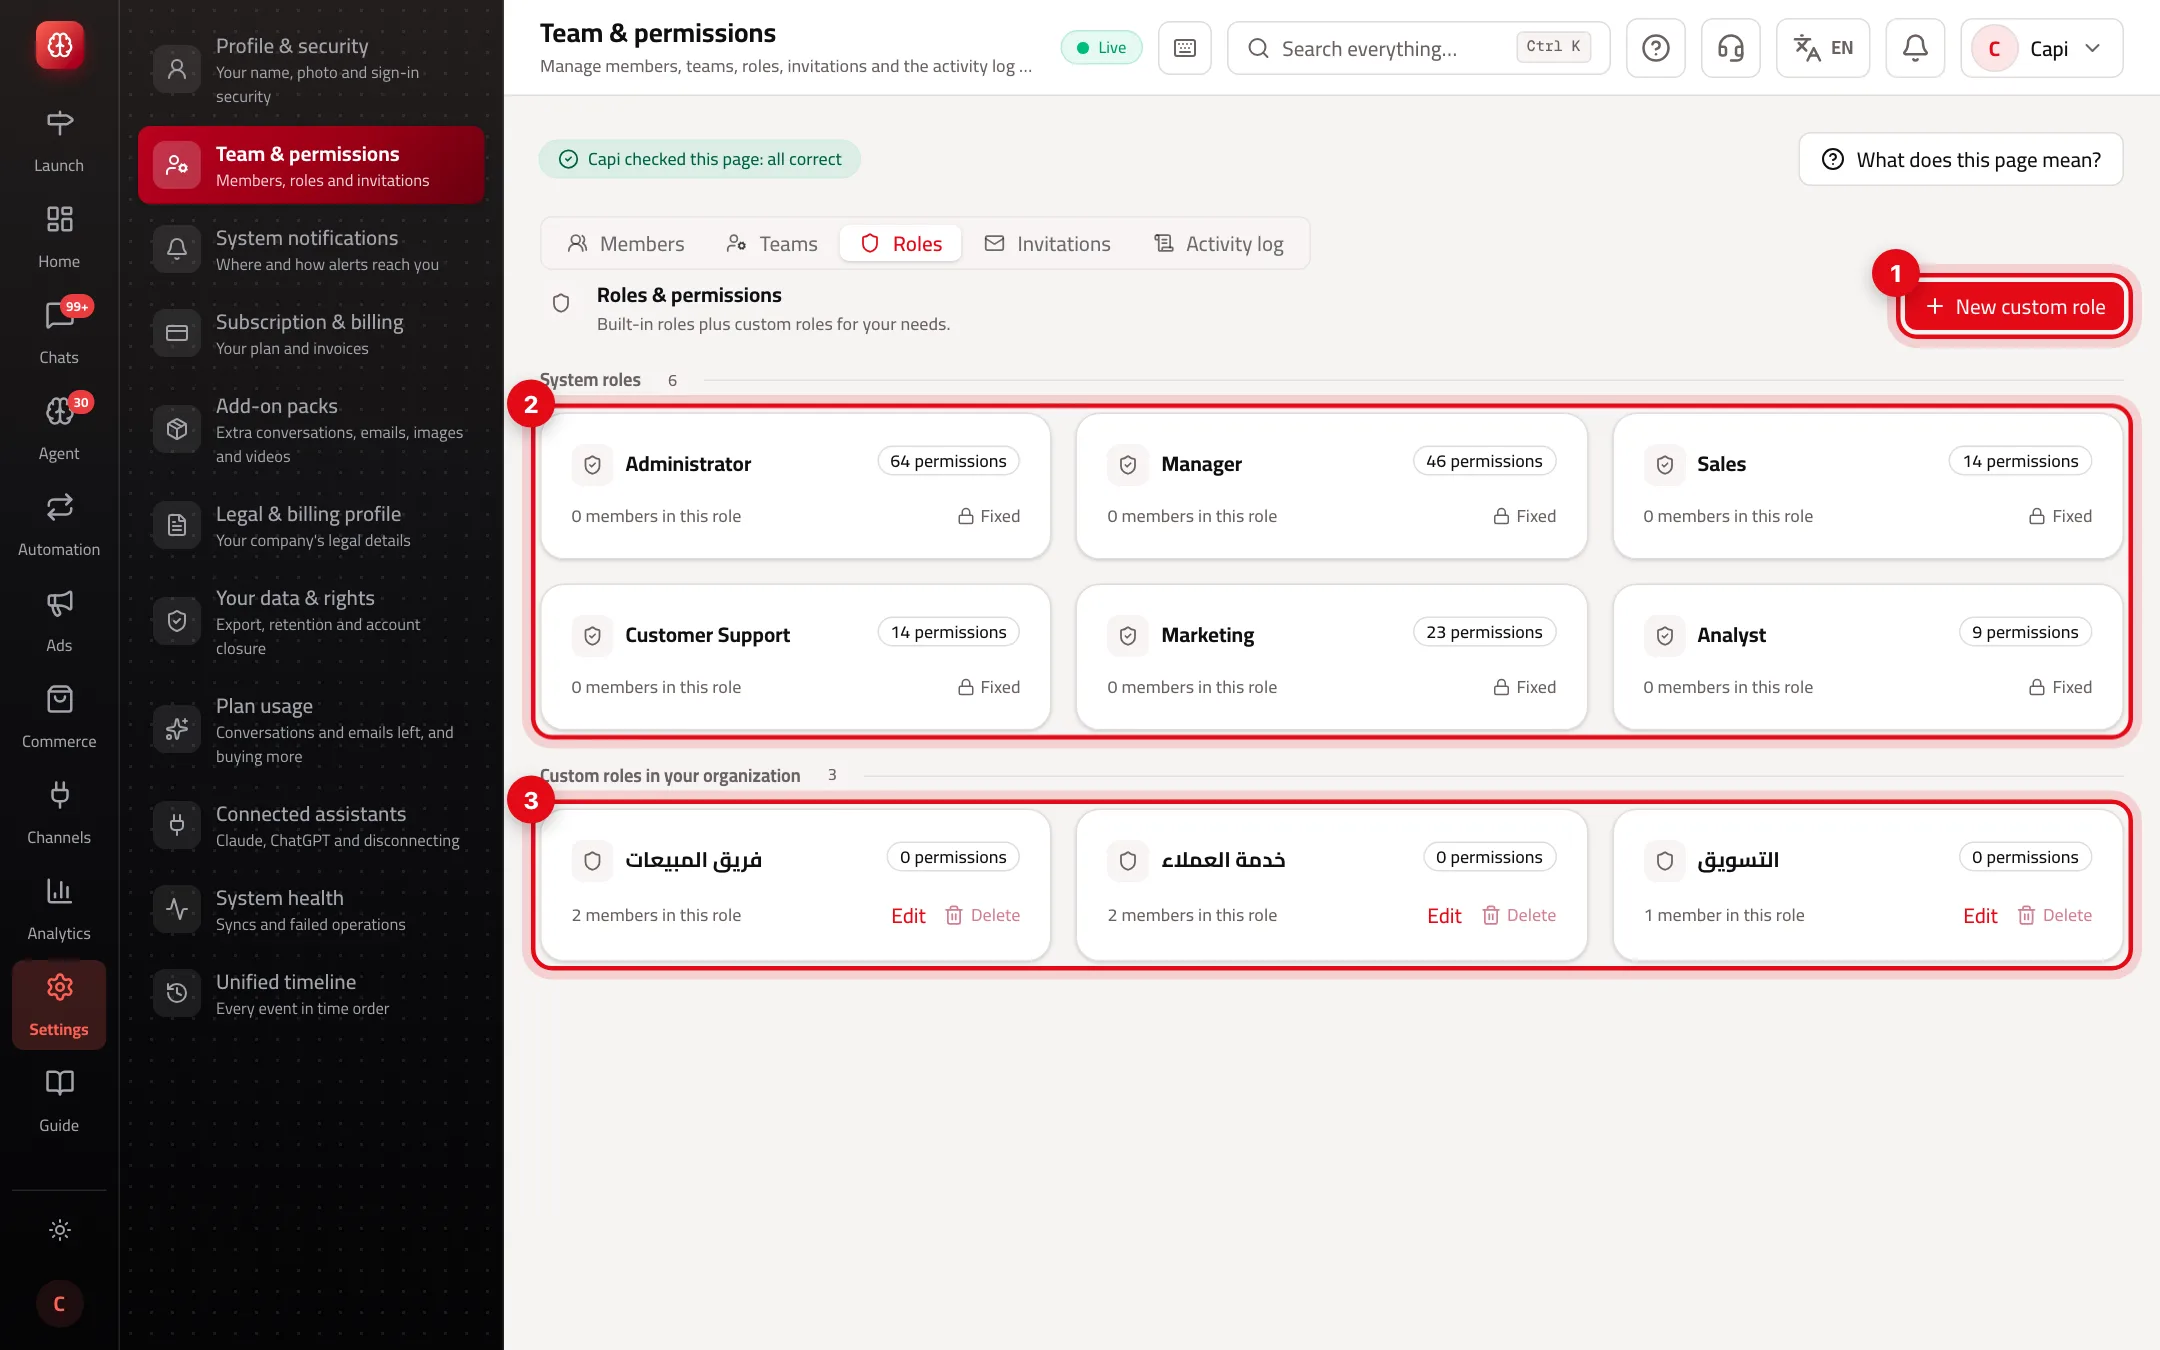
- 1“New custom role”: a name and its permissions.
- 2System roles: fixed roles showing how many permissions each holds; they can't be edited.
- 3Your custom roles: their permission and member counts, with “Edit” and “Delete”.
Create a custom role
- 1
Open the window
In “Roles” press “New custom role” and give it a clear name, e.g. “Senior sales rep”.
- 2
Pick a level per section
Each section (customers, orders, campaigns & automations, billing, team…) has four levels. Under each, “Opens:” lists the pages it unlocks, and “Details” lets you tick single actions.
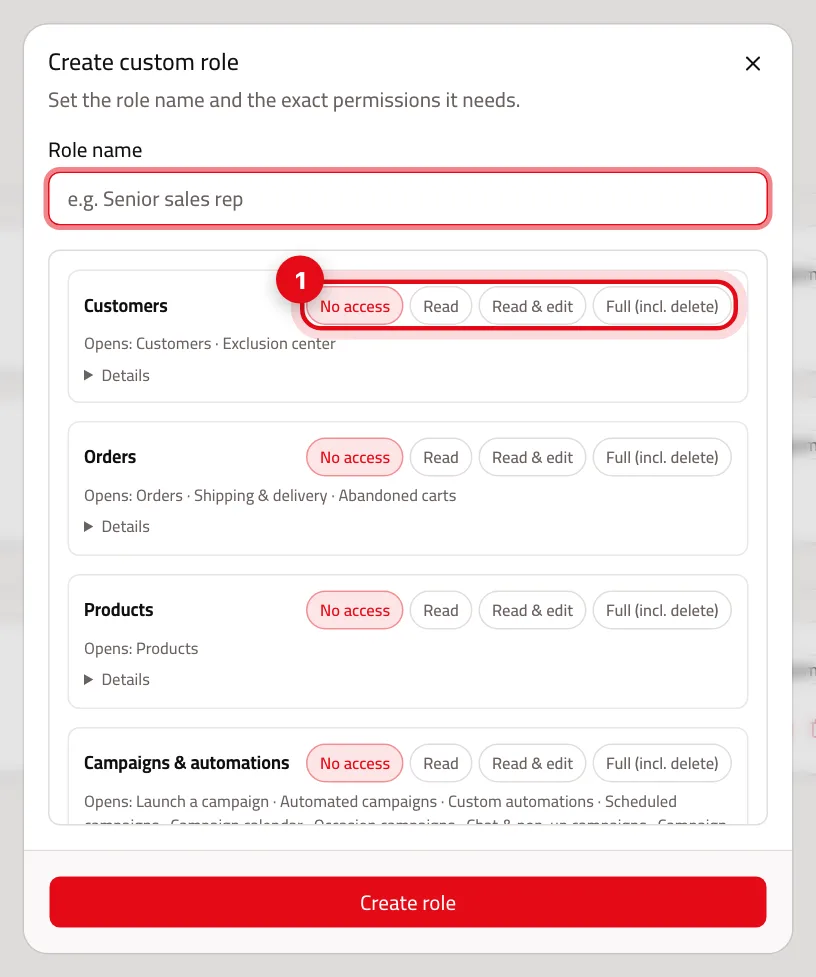
- 1The section's levels: No access, Read, Read & edit, Full (incl. delete).
- 3
Save, then assign it
Press “Create role”. Then pick it when inviting, or from “⋯” → “Change role” for an existing member.
Permission levels
A level is a shortcut that ticks the real actions beneath it. Each level includes the one before:
| Level | What it adds |
|---|---|
| No access | The section and its pages are hidden. |
| Read | Viewing, and exporting where there is one. |
| Read & edit | Daily work: add, edit, reply, send, tag, sync. |
| Full (incl. delete) | Anything irreversible or touching money and access: delete, refund, cancel an order, approve, disconnect a platform, manage the subscription, invite members, manage roles. |
| Custom | Shown when you tick some of a section's actions in “Details” without a full level. |
Nobody can grant a role or permissions they don't hold themselves.
Managing an existing member
| From the “⋯” menu | What happens |
|---|---|
| Change role | Admin, Member or one of your custom roles. Applies from their next request. |
| Access duration | Permanent, 1 day, 1 week, 1 month, 3 months or 1 year. When it ends they're refused at once, and the table shows “Expires in … days”. |
| Suspend | Stops their access without removing them; “Reactivate” any time. |
| Deactivate member | Ends their membership of the account. |
The other tabs
Teams
- What it is
- Groups of members such as “Sales” and “Support”.
- When to use it
- When conversations and escalations should go to a group rather than one person.
- How to start
- “Teams”, then the add button, and choose members. Add or remove people from the team's card.
Invitations
- What it is
- Every invitation sent and its status: awaiting acceptance, accepted, expired, cancelled.
- When to use it
- If the email didn't arrive or the invitation expired.
- How to start
- “Resend”, or “Create & copy a new link” and send it yourself.
Activity log
- What it is
- The last 60 actions on the account: who, what and when.
- When to use it
- To find out who changed a role or cancelled an invitation.
- How to start
- The “Activity log” tab. The full history is in “Unified timeline”.
Best practices
- Give each person the least access their work needs. Start with Member or a custom role and raise it when needed.
- Keep Admin to one or two people — it sees billing, connects platforms and manages the team.
- For freelancers and temporary staff, set an “Access duration” instead of remembering to remove them later.
- When someone leaves, press “Deactivate member” the same day.
- Ask everyone with wide access to turn on two-step verification in “Profile & security”.
Common mistakes and how to fix them
Problem“Next” doesn't work in the invitation.
FixFirst name, last name and email are required. Fill them in.
Problem“This email is already a member” or “There's already a pending invitation”.
FixThey're on the team or have an open invitation. Resend it from “Invitations” instead of creating a new one.
ProblemThe invitation email didn't arrive.
FixIn “Invitations” press “Create & copy a new link” and send it yourself. The old link stops working.
ProblemI can't delete a custom role.
FixMove its members to another role first. A role with members can't be deleted.
ProblemA member with a custom role sees no pages.
FixThe role has no permissions. Open “Edit” on the role and raise the sections they need.
Problem“You don't have permission” when granting Admin.
FixOnly a member with full access can grant Admin, and nobody can grant permissions they don't have.
Screenshot from a demo store
Parts of the page
- 1
Members
Everyone with dashboard access, and their role. The tabs here move between members, teams, roles, invitations and the log.
- 2
Teams
Groups of members that conversations and escalations are routed to.
Example“Finance” receives refund requests, “Support” everything else. - 3
Roles
What each member can see and do in the dashboard.
ExampleA member with the “Sales” role replies to conversations but can't see billing or connect platforms. - 4
Invitations
Invitations you sent that haven't been accepted yet.
- 5
Activity log
Who changed what, and when, in the account.
Related articles
Didn't find your answer?