Automations & campaigns
Custom automations
Triggers with your own steps
A custom automation starts from an event you choose, and runs alongside the ready-made ones.
Open the page in the dashboardWhen you need a custom automation
Built-in automations are known moments you just turn on. A custom automation lets you pick its event, who it goes to and at what order value, and write its message sequence. It runs alongside the built-in ones, never instead of them.
A custom automation is always marketing: it counts toward the same weekly cap and WhatsApp daily limit, and never reaches someone who unsubscribed. Transactional order-status messages belong in “Order status notifications” under automated campaigns.
A new custom automation is created with a first step but no channel on, so it sends nothing until you turn on a channel in “Trigger settings”. One copied from a recipe is added paused so you can review its text first.
The events it can start from
Two event sources: the customer's activity with the agent (checked about every hour), and an order status change in your connected store (runs immediately).
The agent recommended a product
- What it is
- Starts when the agent recommends a product to the customer in a chat.
- When to use it
- A follow-up hours later for those who didn't buy — the closest moment to a purchase.
- How to start
- “Event source”: “Customer activity event”, “Event type”: “The agent recommended a product”. Set the step condition to “If not purchased”.
Started checkout
- What it is
- Starts when the customer confirms to the agent that they want to buy and the agent sends the payment link or checkout steps.
- When to use it
- Rescuing someone who reached payment and stopped. The minimum and maximum value read the product price.
- How to start
- “Event type”: “Started checkout”. A short delay, such as 45 minutes.
Started a conversation
- What it is
- Starts with every new conversation a customer opens with your store.
- When to use it
- Welcoming people who actually talked to you, a day after the chat.
- How to start
- “Event type”: “Started a conversation”.
Order status change
- What it is
- Starts the moment an order moves to a status you pick: Pending, Processing, Shipped, Delivered, Cancelled, Refunded. The minimum and maximum read the order total.
- When to use it
- Asking why a large order was cancelled, or checking in after a refund.
- How to start
- “Event source”: “Order status change”, then pick the “Order status”. The message goes out the moment the status changes, so keep it to one message.
Read the “Custom automations” page
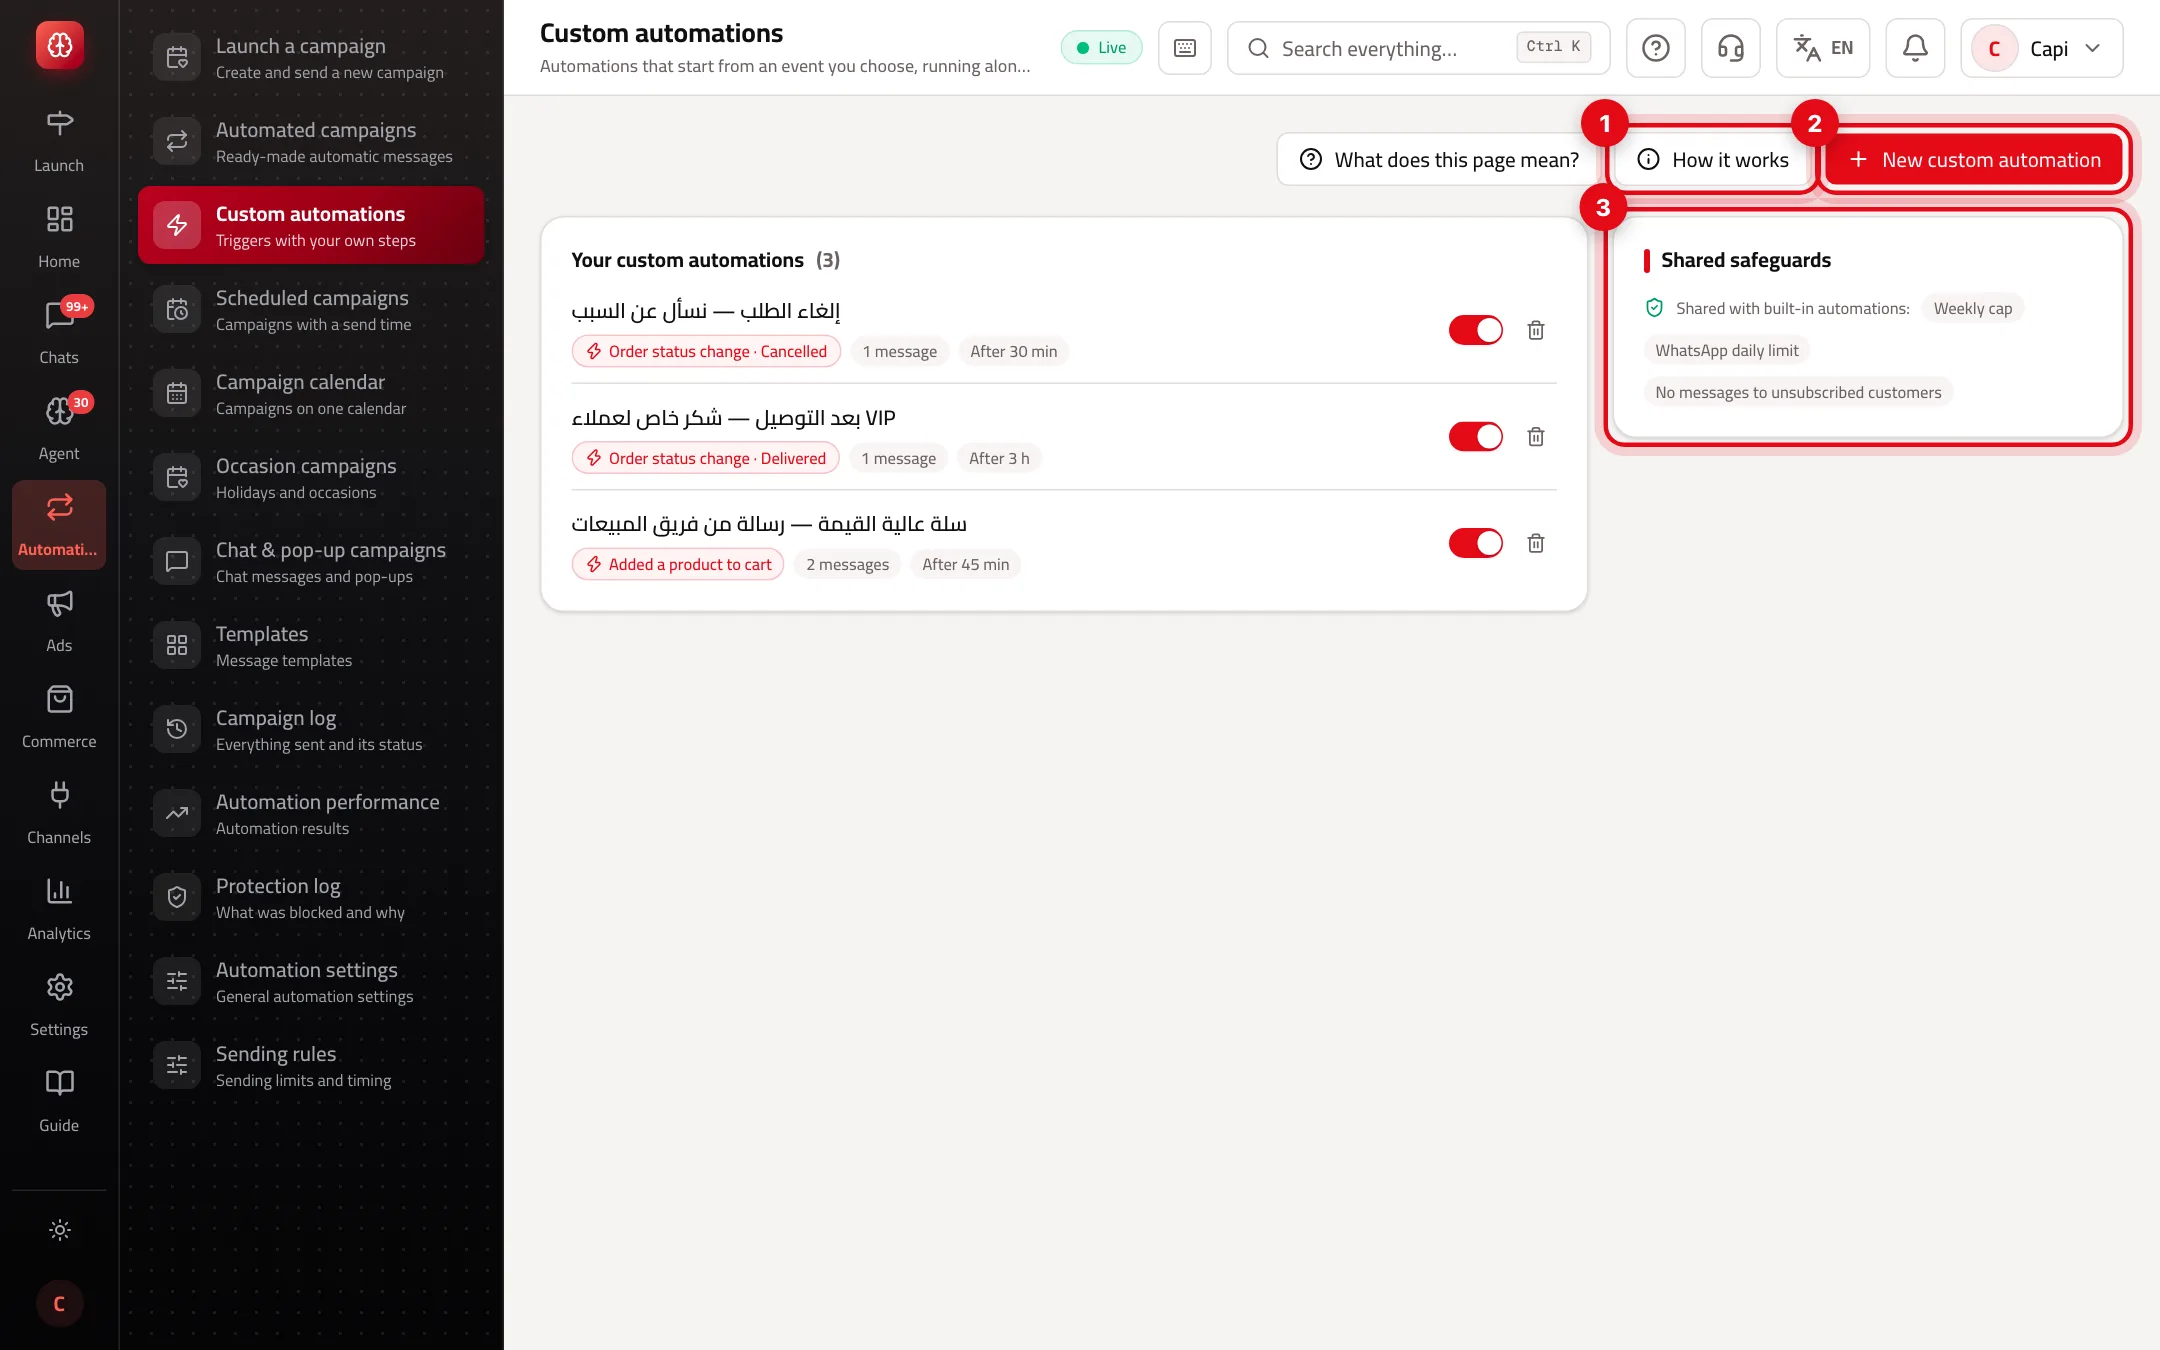
- 1“How it works”: built-in and custom automations side by side.
- 2“New custom automation”: a blank form and ready recipes in one window.
- 3“Shared safeguards”: the weekly cap, the WhatsApp daily limit, and no messages to unsubscribed customers.
Create a custom automation
- 1
Open the form
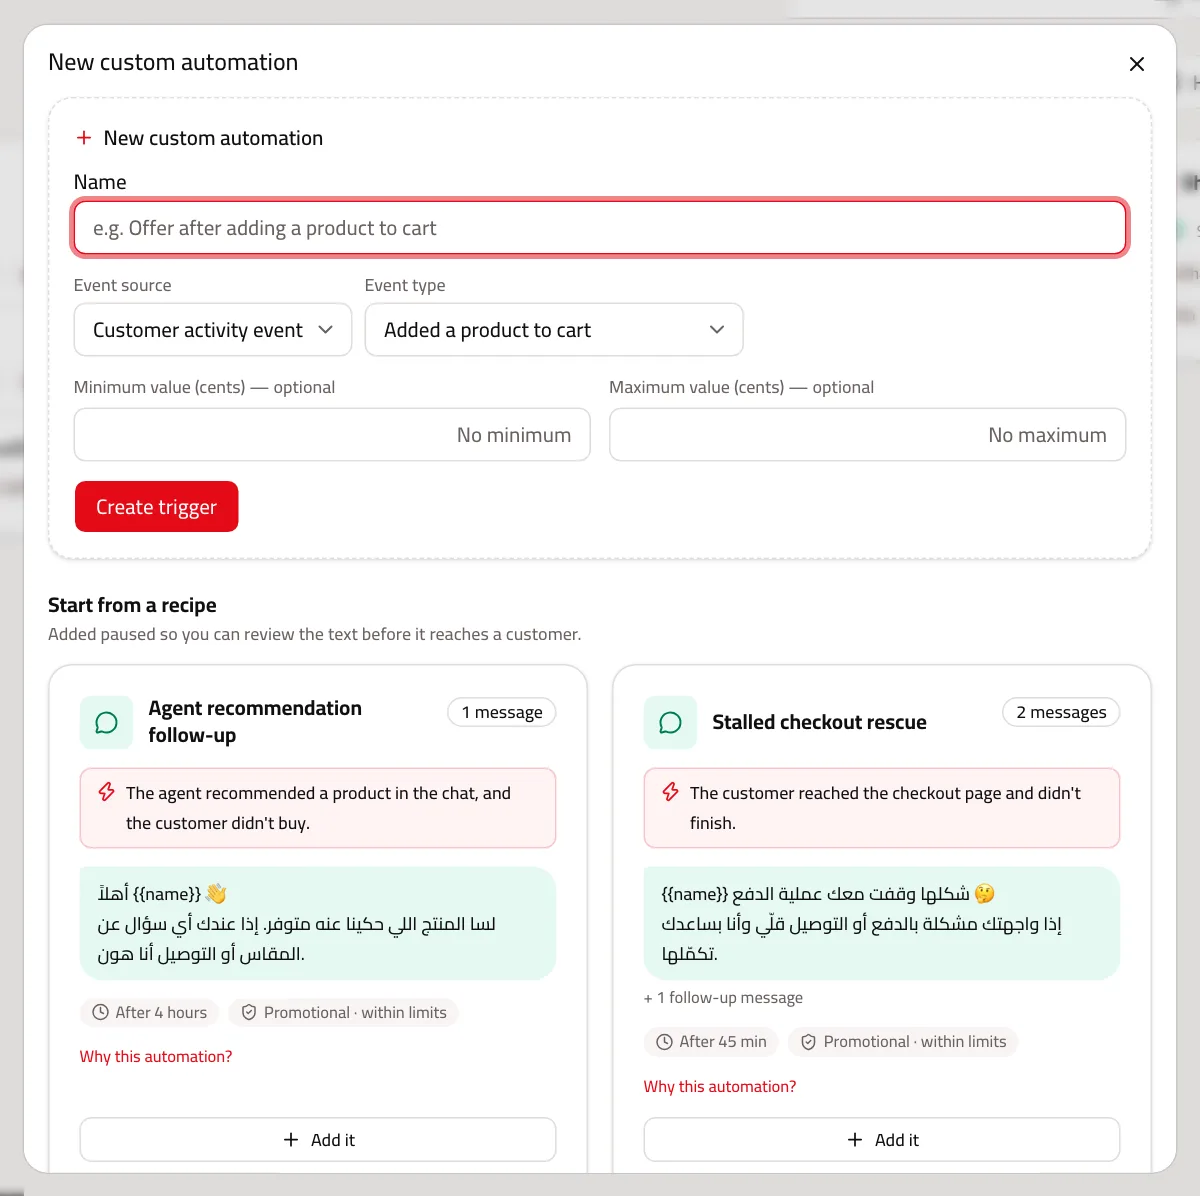
Press “New custom automation”. The blank form is at the top of the window, with “Start from a recipe” below it.
- 2
Name it and pick the event
Write the “Name”, then the “Event source” and the “Event type” or “Order status”. You can set “Minimum value (cents)” and “Maximum value (cents)”: the value is in the currency's smallest unit, so 500 SAR is 50000. Press “Create trigger”.
- 3
Adjust the settings
Open it from the list. In “Trigger settings” turn on “Send via WhatsApp”, set the “Default delay (minutes)”, and you can set the “Minimum days between this trigger's messages” so it doesn't repeat on the same customer. Press “Save settings”.
- 4
Write the messages and set the audience
Edit the first step's text and pick a template for outside the 24-hour window. Add steps with “Add step”, each with its own condition. Then narrow the audience if you like, by segment, city or value.
- 5
Switch it on
The “Turn trigger on/off” switch is next to its name in the list. After its first real message, you can't change its event type or delete it — turn it off instead.
Built-in versus custom
| Built-in automations | Custom automations | |
|---|---|---|
| Event | Fixed for each type | You pick it |
| Value condition | None | Minimum and maximum event value |
| How many | 13 types, no more can be added | No limit |
| Protection | Weekly cap, WhatsApp limit, unsubscribes | The same, counted together in the weekly cap |
| Priority when the cap is tight | By type | After every built-in type |
Ideas that work
- Agent recommendation follow-up: “The agent recommended a product”, after 4 hours, with “If not purchased”. No built-in type covers this moment.
- Asking about a cancellation: “Order status change” → “Cancelled” with a “Minimum value” for large orders only. A message asking why wins some orders back.
- Post-refund follow-up: “Refunded”, with a message asking what didn't suit the customer.
- Use the minimum value to split regular and large orders, with a different message for each in two automations.
- Set “Minimum days between this trigger's messages” for any event that repeats often, such as “Started a conversation”.
Common mistakes and how to fix them
ProblemYou created an automation and it sends nothing.
FixNo channel is on. Open it, turn on “Send via WhatsApp” in “Trigger settings”, then “Save settings”.
ProblemYou copied a recipe and it doesn't run.
FixRecipes are added paused. Review the text, then turn on the “Turn trigger on/off” switch.
ProblemYou can't change the event type.
FixThe automation has sent real messages. Create a new one with the other event and turn the old one off.
ProblemThe value condition never matches an order.
FixThe value is in cents: 500 SAR = 50000, not 500.
Screenshot from a demo store
Parts of the page
- 1
How it differs from ready-made
Ready-made automations are known moments you just turn on. A custom one lets you pick its event, who it goes to and under what conditions, and write its messages.
ExampleEvent “Order cancelled” → for orders over 500 SAR → a message asking why. - 2
The same protection
It shares the weekly cap and WhatsApp's daily limit, and never reaches anyone who unsubscribed.
Related articles
Didn't find your answer?