Channels & platforms
Stores & platforms
A brand is your workspace: its products, channels, conversations and team. Connecting your store platform (Salla, Zid, Shopify…) brings in products and orders so the agent knows them.
Open the page in the dashboardHow connecting your store works
A brand in Capi is your store: its own products, channels and agent. You connect it to the commerce platform your store runs on, and products, orders, customers and stock come into Capi for the agent and automations to work on.
One rule: each brand connects to one store source only — one platform or the custom store. Once a brand is connected, the other platforms show as “Locked”. For a second shop, add a second brand. Reconnecting the same platform is always allowed.
After connecting, sync runs by itself twice a day. Platforms with instant notifications (webhooks) also send every change as it happens.
Read the page
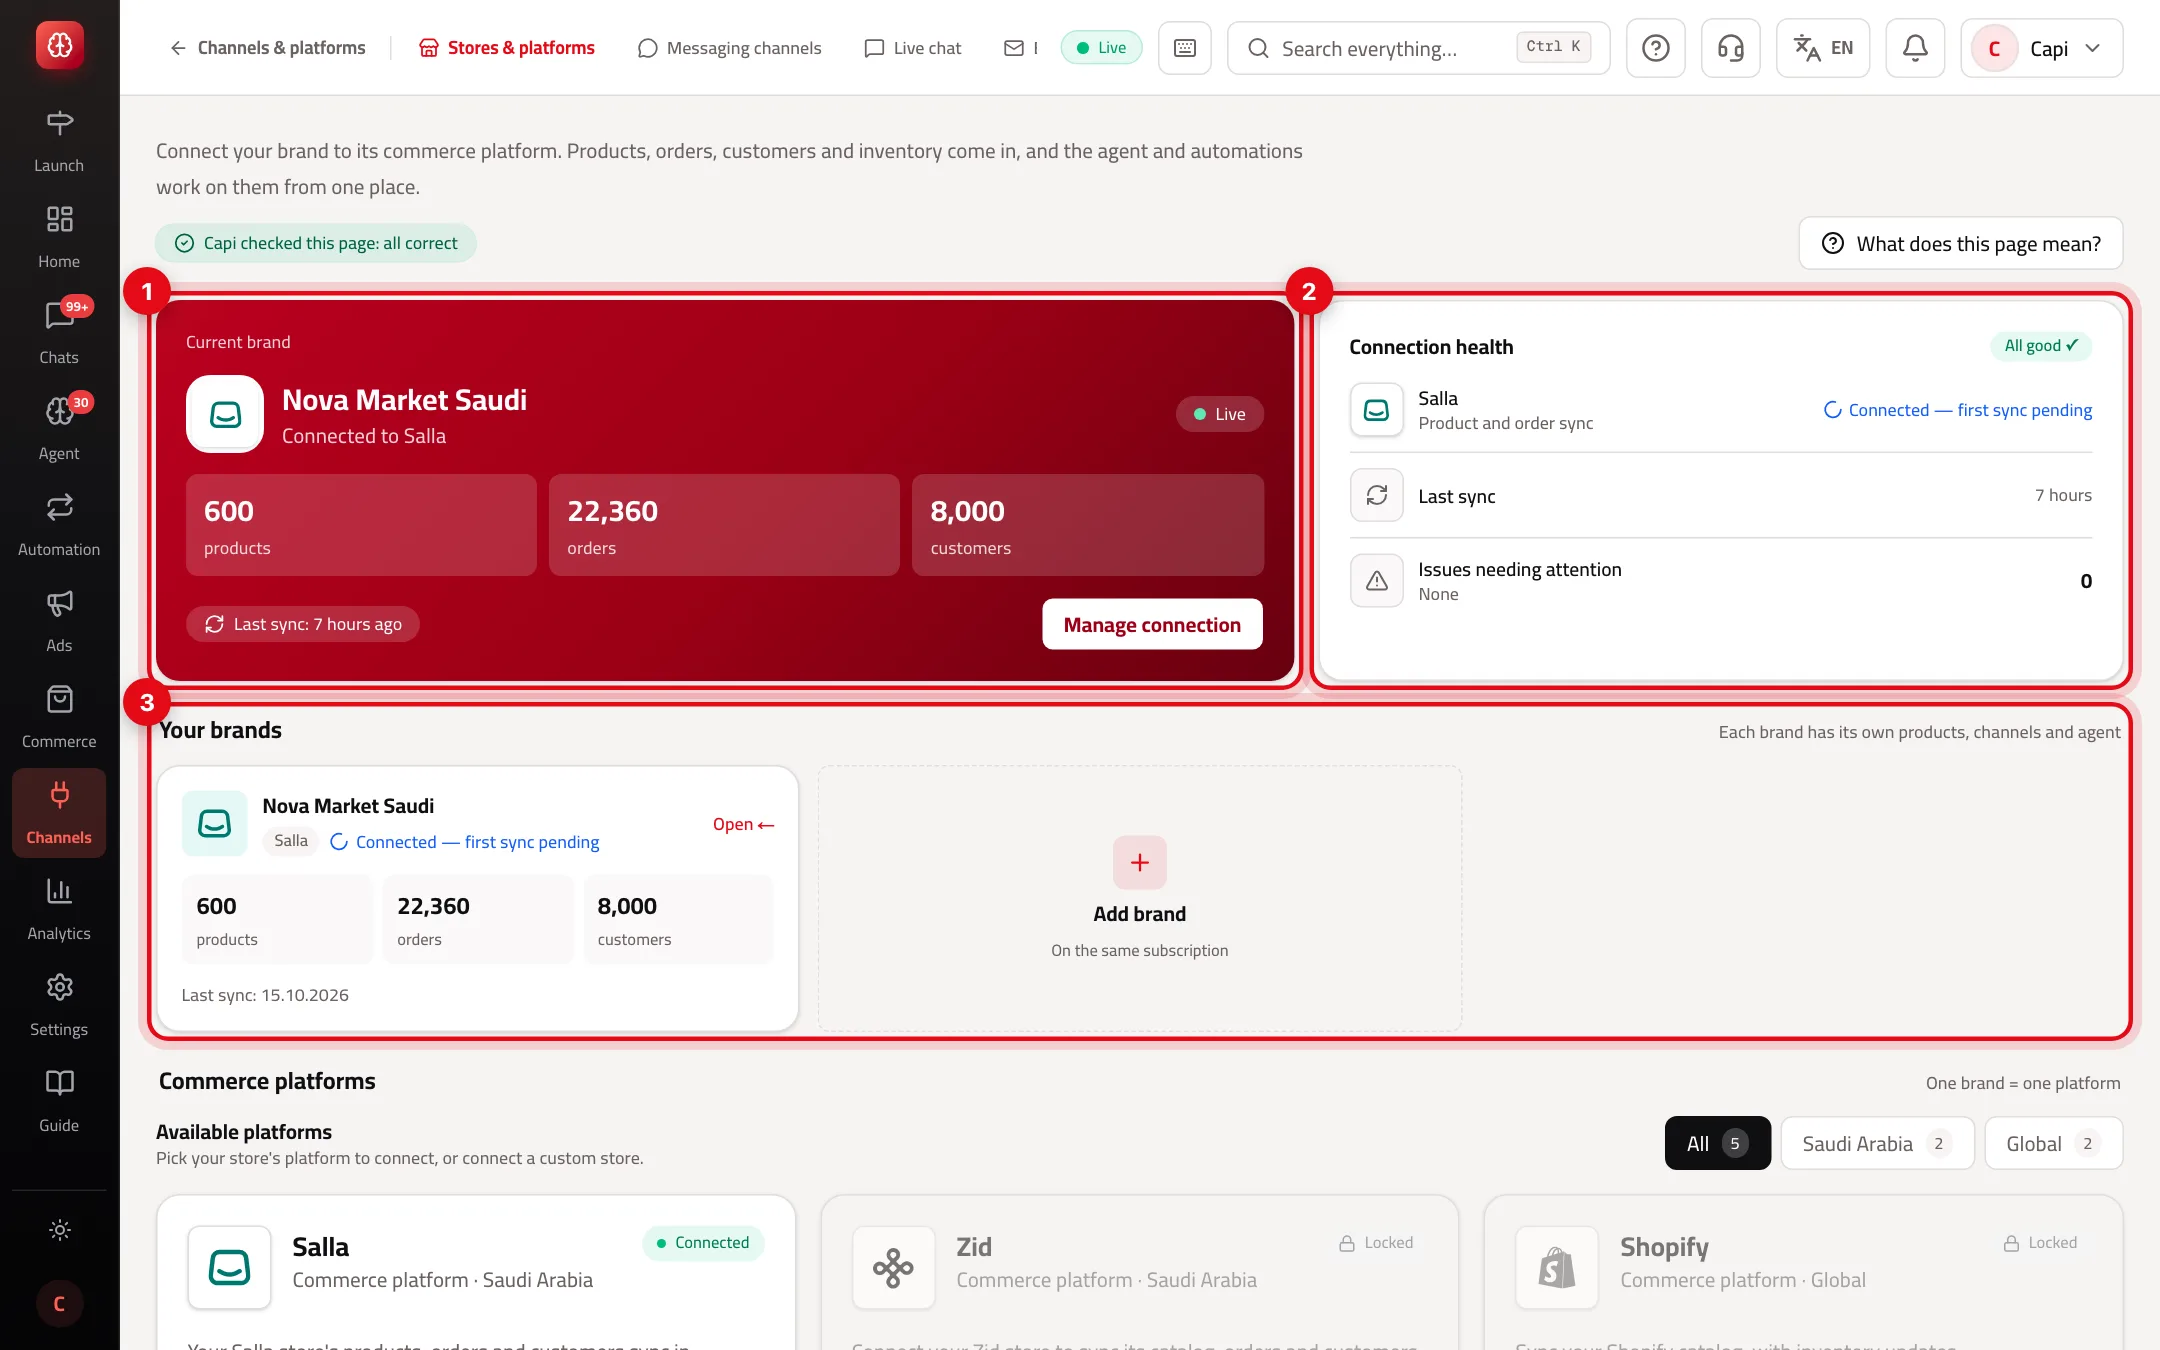
- 1The current brand: the platform it's connected to, its products, orders and customers, and the last sync. “Manage connection” opens the brand's workspace.
- 2“Connection health”: the last sync and how many issues need your attention.
- 3“Your brands”: a card per brand, and an “Add brand” card.
Pick your platform
At the bottom is “Commerce platforms”. Each card shows how it connects, what syncs and how updates arrive.
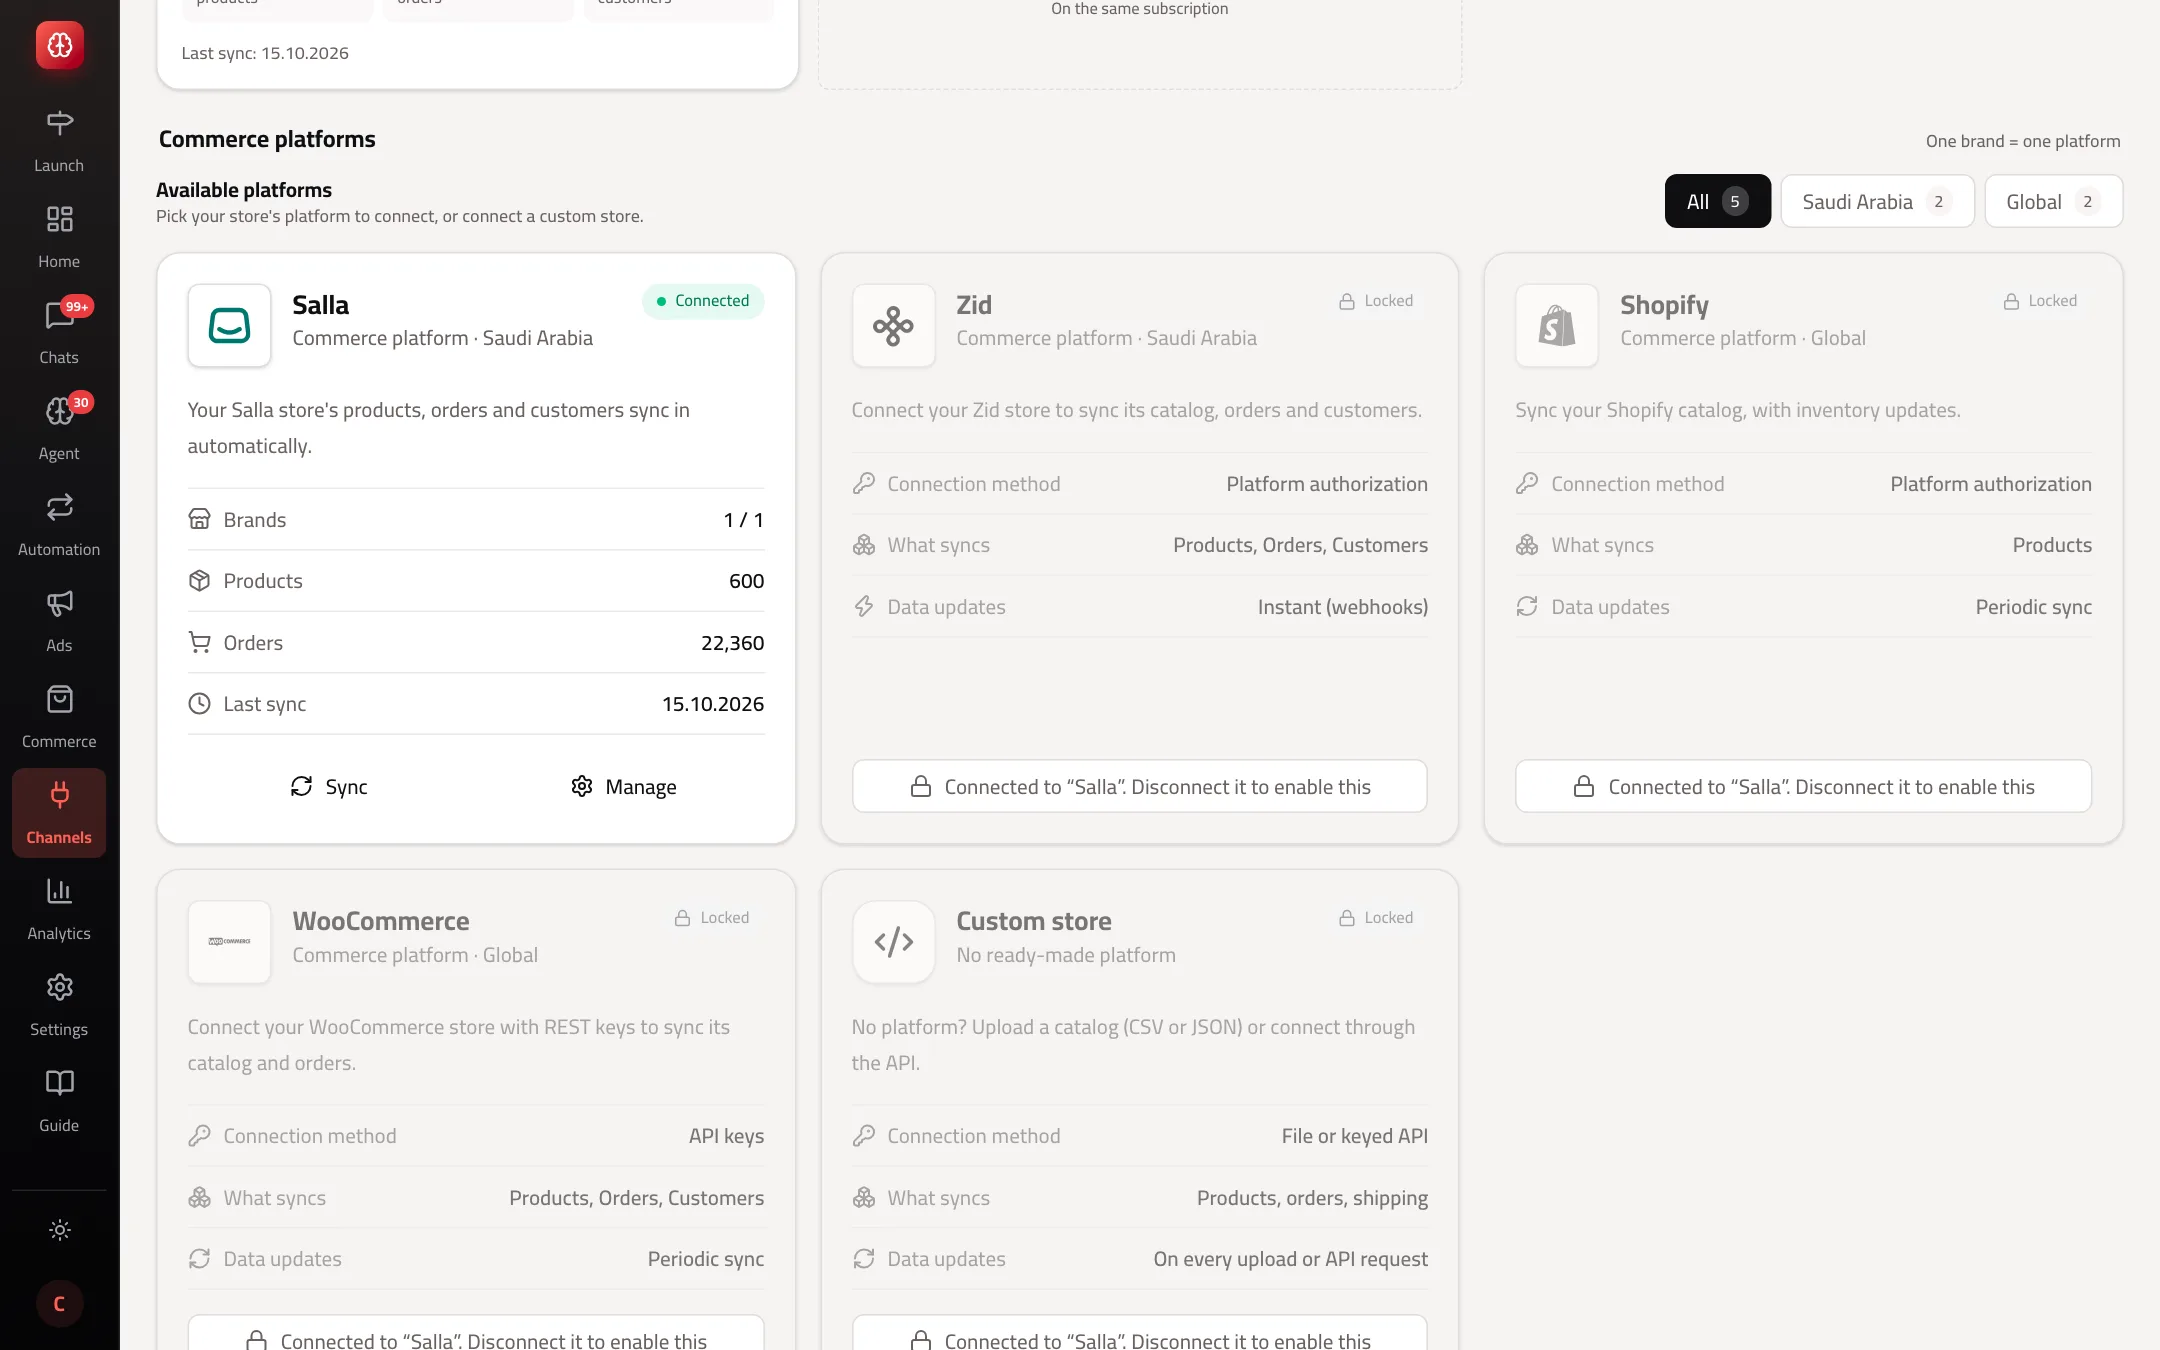
- 1Filter platforms by market: All, Saudi Arabia, Global.
- 2A connected platform: “Connected”, with “Sync” and “Manage”.
- 3A locked platform, because the brand is connected to another source. The button opens the brand settings where you disconnect the current one.
What each platform brings
“Yes” means it was tried on a real store. “Not yet” means it isn't proven yet — don't rely on it:
| Platform | Connects with | Products & stock | Orders | Customers | Instant updates |
|---|---|---|---|---|---|
| Salla | Platform authorization | Yes | Yes | Yes | Yes |
| Zid | Platform authorization | Yes | Yes | Yes | Yes |
| Shopify | Platform authorization | Yes | Not yet | Not yet | Not yet — periodic sync |
| WooCommerce | WordPress plugin | Yes | Yes | Yes | Not yet — periodic sync |
| Custom store | Catalog file or keyed API | Yes | Through the API only | Through the API only | Whenever your system sends |
Connect Salla
- 1
In Capi
On the Salla card press “Connect to “your brand””. There are no fields to fill.
- 2
In Salla
Salla's install page for the Capi app opens. Sign in to your store if asked and approve the permissions.
- 3
How you know it worked
You return to Capi with a “Connected” message, the Salla card shows “Connected”, and the product count starts rising within minutes.
Connect Zid
- 1
In Capi
On the Zid card press “Connect to “your brand””.
- 2
In Zid
Zid's authorization screen opens. Sign in and approve the permissions.
- 3
How you know it worked
You return to the brand page with a “Connected” message. Capi registers Zid notifications for orders, products and customers, and the first import starts.
Connect Shopify
- 1
Open the connect page
On the Shopify card press “Connect to “your brand””. The brand workspace opens on “Connect platforms”; press “Connect” on the Shopify card.
- 2
Enter your store address
In “Shopify store address” paste your permanent myshopify.com address, such as mystore.myshopify.com — not your own domain. Then press “Connect via Shopify”.
- 3
In Shopify
Shopify's app install screen opens and lists the permissions requested. Press the install button.
- 4
How you know it worked
You return with a “Connected” message and products start arriving. Shopify updates arrive with the periodic sync.
Connect WooCommerce with the plugin
- 1
Download the plugin
On the WooCommerce card press “Connect to “your brand””, then “Connect”, then “Download plugin”.
- 2
Install it in WordPress
In WordPress: Plugins → Add New → Upload Plugin. Upload the file and activate it. A “Capi Agent” menu appears in the sidebar.
- 3
Connect in one click
Open “Capi Agent” in WordPress and press “Connect with Capi Agent”. You land in Capi: choose the brand and press “Connect”, then you're back in WordPress, connected.
- 4
Or with a pairing code
In Capi press “Create pairing code” and copy it. On the Capi Agent page in WordPress paste it under “Pairing code” and press “Connect store”. The code is valid for one hour and works once.
- 5
How you know it worked
WordPress reads “Connected to …”, and in Capi the card shows “Connected” with “WooCommerce store connected. Importing products and orders.”
Can't install plugins on your site?
In the WooCommerce connect window press “Can't install plugins on your site?”, type your store address, then approve on WooCommerce's page. Products and orders will sync, but chat will need code pasted into your theme.
The brand workspace
Press “Manage connection”, or “Open” on a brand card. The side menu holds everything about connecting this brand.
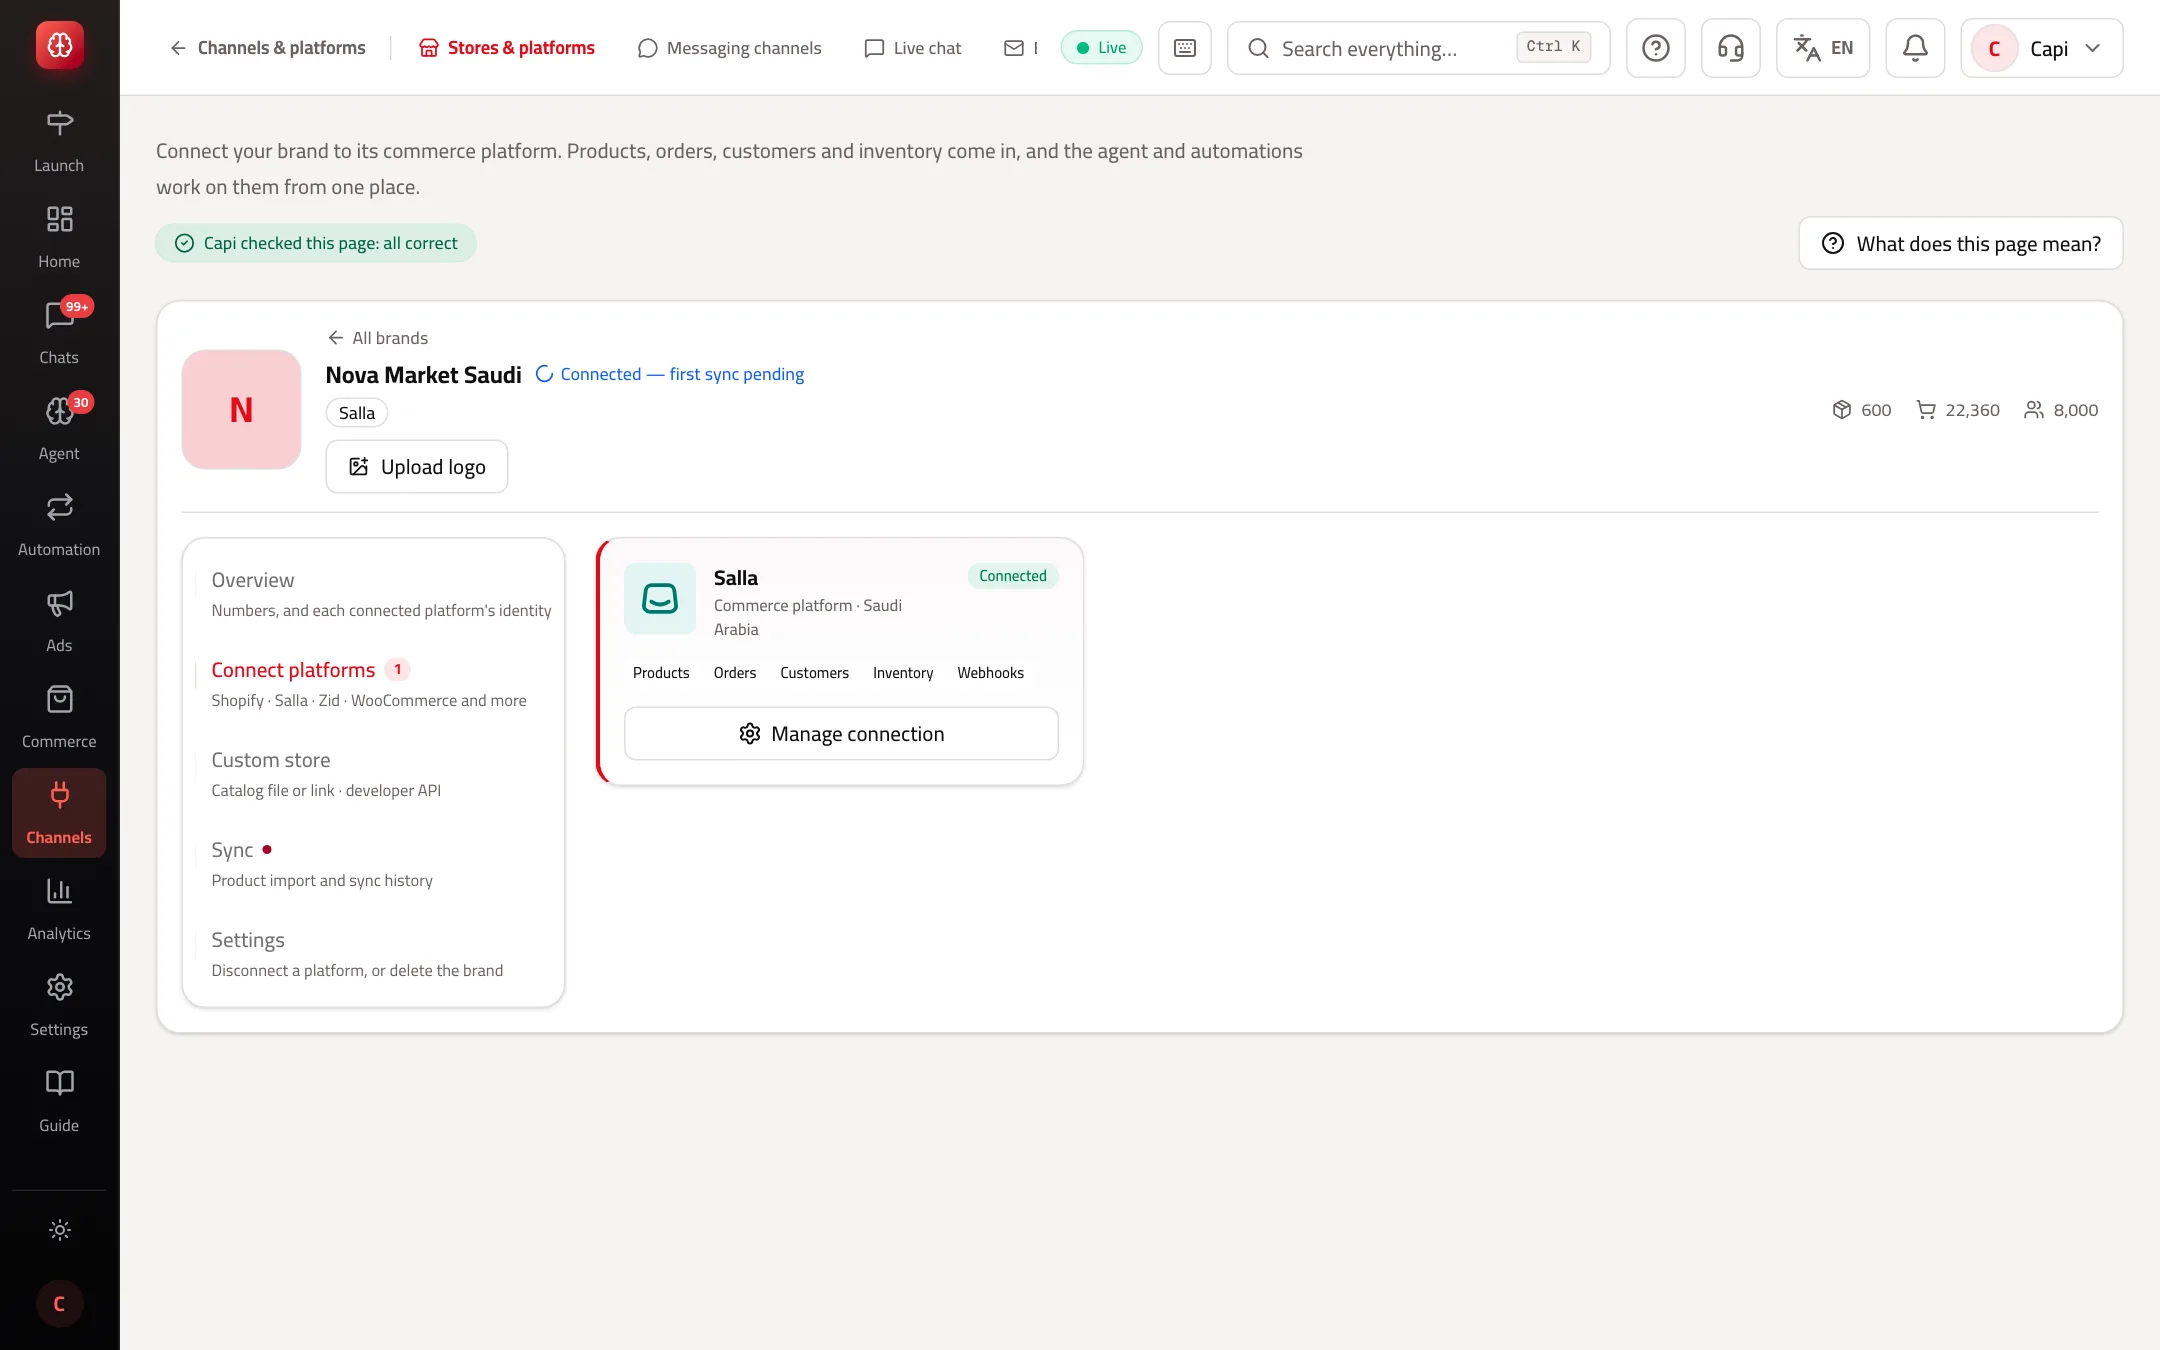
- 1“Connect platforms”: the connected platform's card — before connecting, every platform.
- 2“Manage connection”: opens the platform window — sync now, re-authorize, disconnect.
- 3“Sync”: the automatic schedule and a log of every run.
- 4“Settings”: disconnect a platform, or delete the brand permanently.
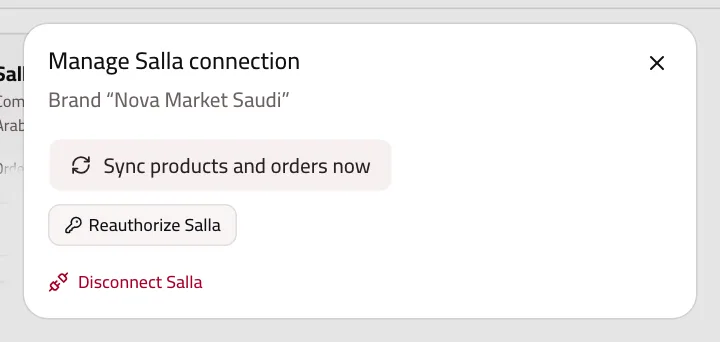
The “Manage connection” window
Here you sync products and orders right away, or re-authorize the platform when you're asked to grant a new permission.
No ready-made platform: the custom store
If you built your store yourself or on a system not listed, pick the “Custom store” card, then “Set up for “your brand””. Choose one of two ways:
- 1
Pick how to connect
“Full connection (API)” (recommended): your system sends products, orders and shipping updates instantly. “Products only”: from a feed link or a file, no orders.
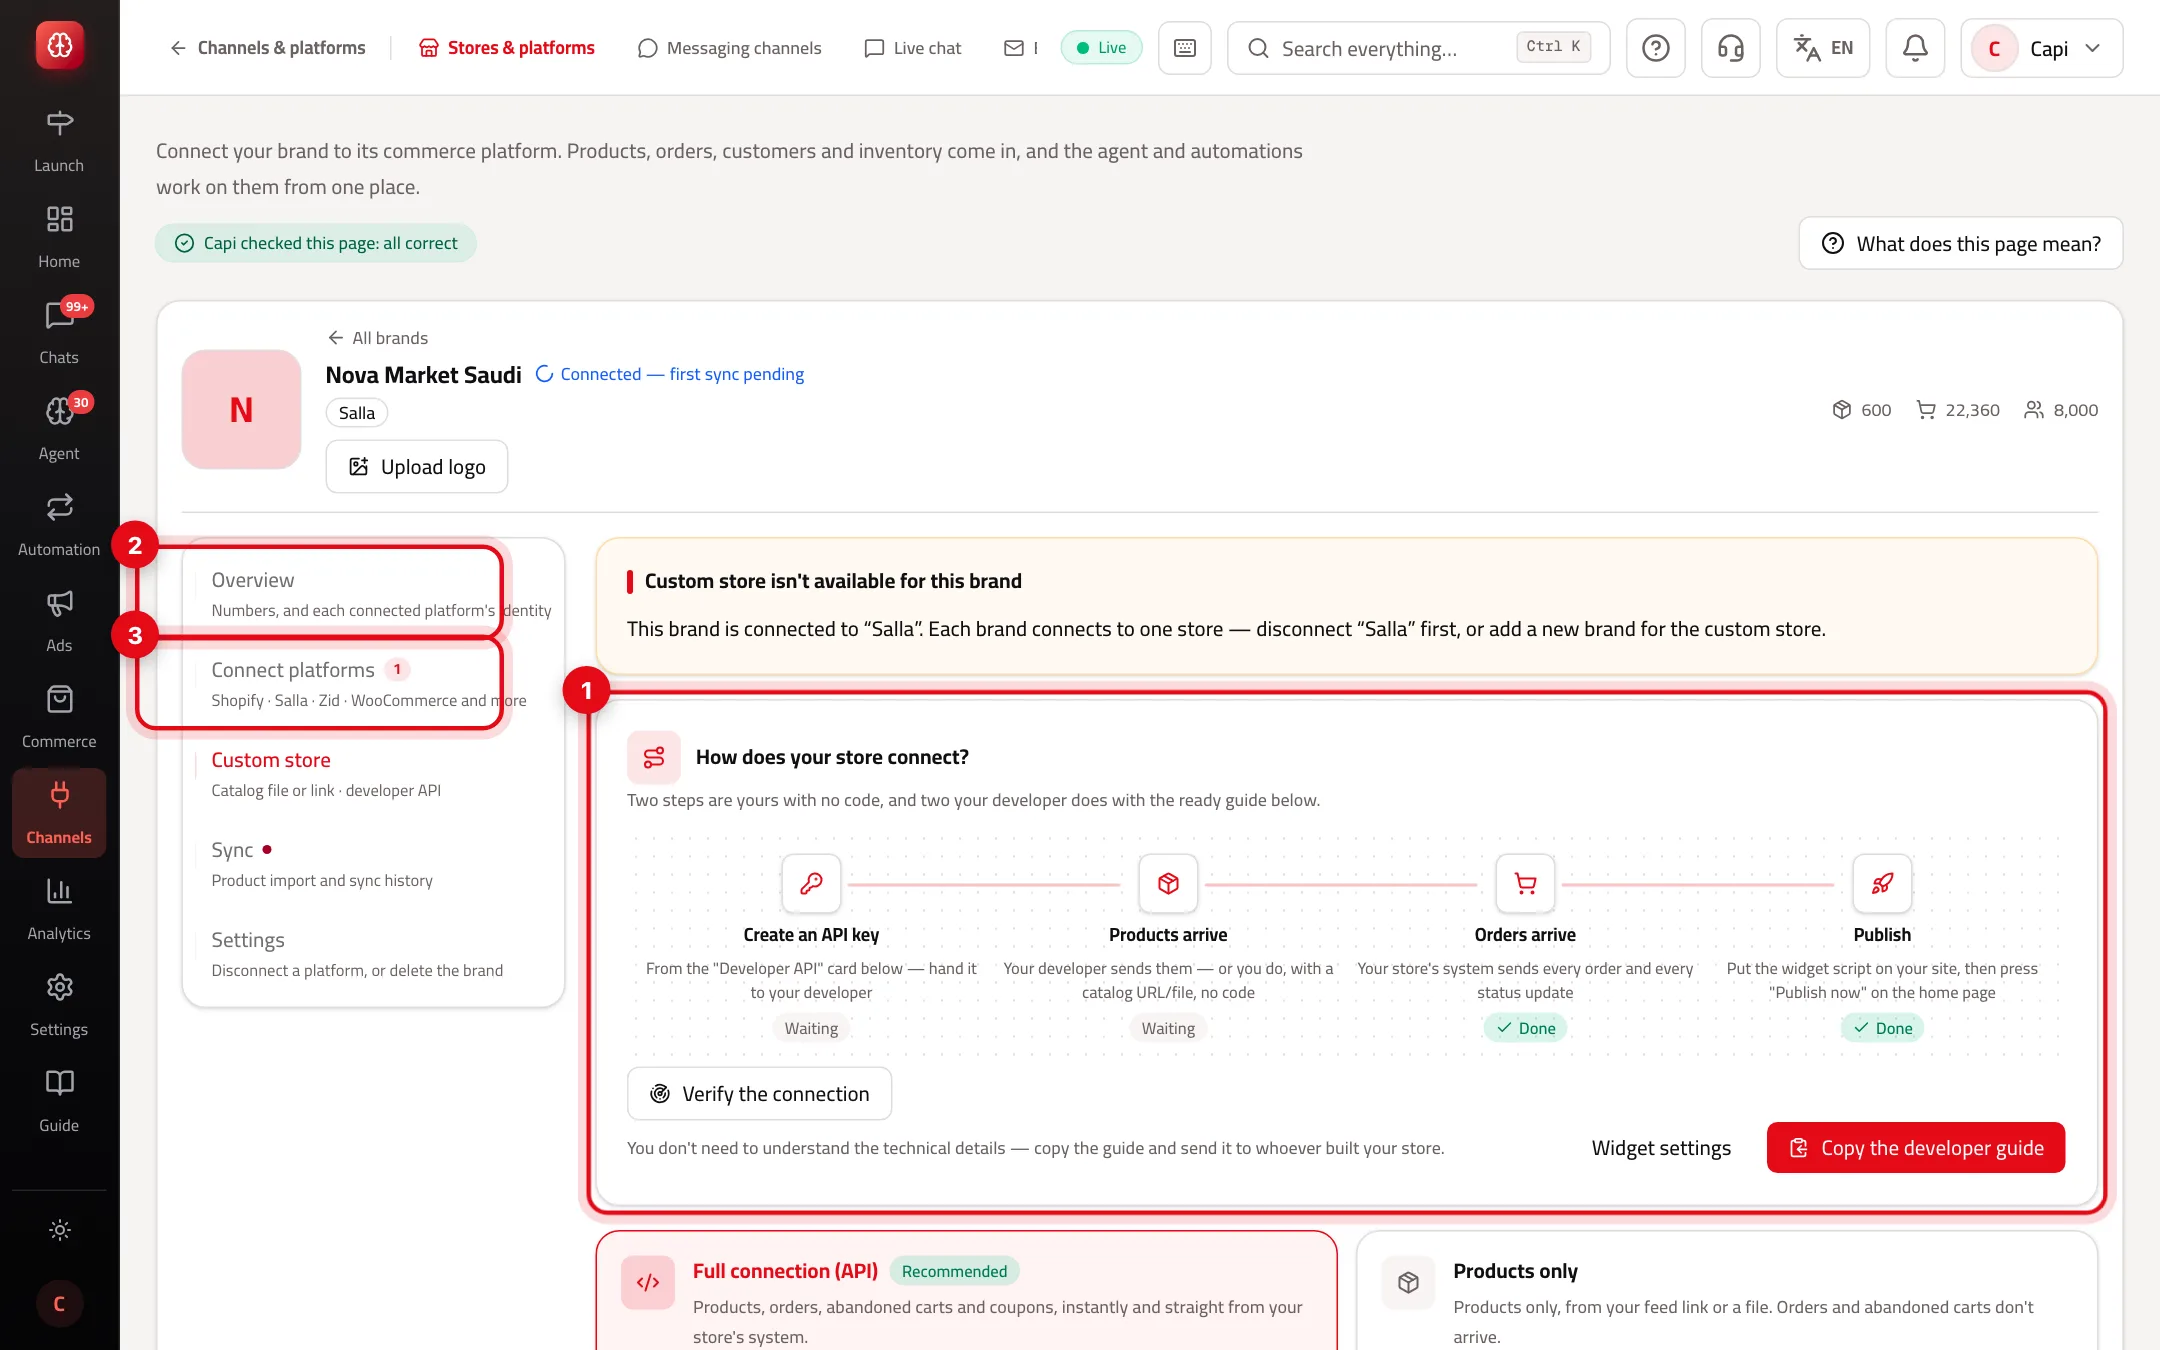
- 1“How does your store connect?”: four steps and the state of each. “Verify the connection” checks that data arrived.
- 2“Full connection (API)”.
- 3“Products only”.
- 2
Full connection: create a key
Under “Developer API” name the key and pick “Live key” (writes data) or “Test key” (validates, writes nothing), then “Create key”. Copy it now — it won't be shown again.
- 3
Send it to your developer
Press “Copy the developer guide” and send the guide and the key to whoever built your store. Full documentation is on the developers page.
- 4
Products only: a link or a file
Paste the “Feed link” (the same link as your Google or Facebook catalog, in XML, CSV or JSON) and press “Save and start fetching”. The link refreshes automatically with the brand's twice-daily sync.
- 5
How you know it worked
The card turns “Active” once the first product arrives, and the “Products arrive” and “Orders arrive” steps show “Done”.
Follow the sync
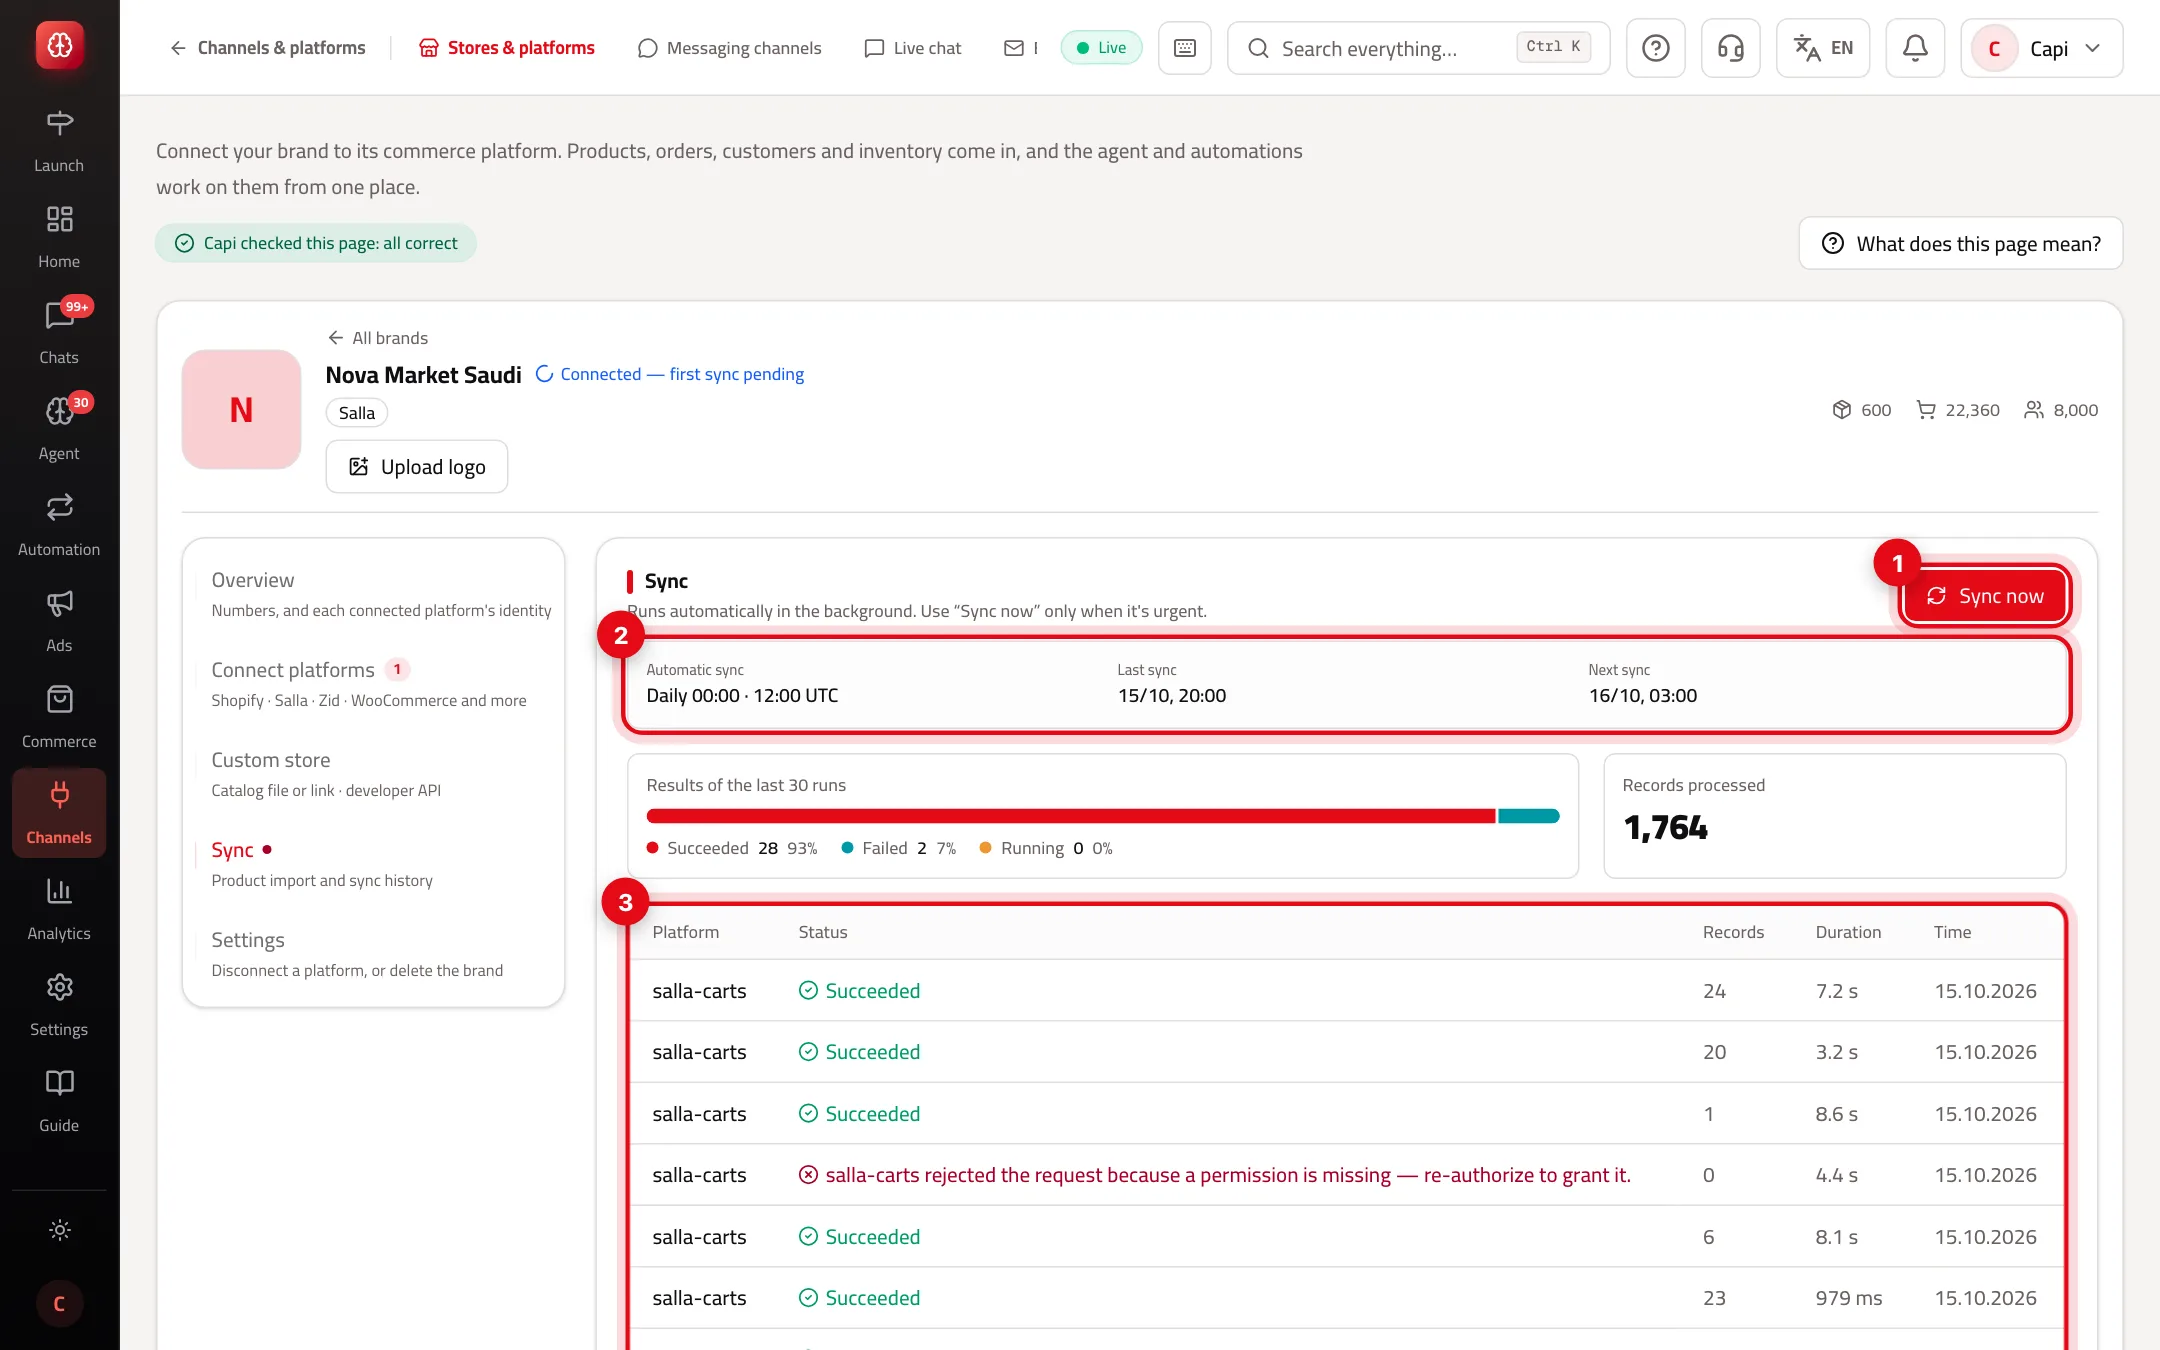
- 1“Sync now”: only when it's urgent — sync runs by itself.
- 2“Automatic sync”: its schedule, the last sync and the next one.
- 3A log of every run: platform, status, records and duration. On a failure the reason is written, such as a missing permission that needs re-authorizing.
Best practices
- After connecting, open “Products” and check the count matches your store, then enter cost prices.
- Don't disconnect your platform to try another. Disconnecting stops sync; for a second shop add a brand.
- If the log shows a missing-permission message, re-authorize from “Manage connection”. It doesn't delete any data.
Common mistakes and how to fix them
ProblemThe platform card says “Locked”.
FixThe brand is connected to another source. Disconnect it in “Settings” → “Disconnect a platform”, or add a new brand for this store.
Problem“This brand is already connected to another store platform”.
FixSame reason: each brand connects to one store. Disconnect the current platform first, or add a brand.
ProblemShopify rejects the address.
FixUse the permanent myshopify.com address from your Shopify admin, not your own domain.
ProblemThe WooCommerce pairing code doesn't work.
FixIt's valid for one hour and works once. Press “Create a new code” and paste it right away.
ProblemI disconnected the platform — is my data gone?
FixNo. Disconnecting only stops sync and notifications; products, orders and customers are kept.
Screenshot from a demo store
Parts of the page
- 1
Your brands
Each brand is a card. You can add more than one brand on the same subscription.
- 2
One platform per brand
A brand connects to one commerce platform only. For a second store, add a second brand.
Playbooks that use this page
Related articles
Didn't find your answer?